
3rd Thurs Blog - Mix & Match - April 2022

Forever Fern
Triple Stamping & Masking Techniques

Hello my stamping friends.
Welcome to the 3rd Thurs Blog Hop. This month is our transition month between catalogs… so if you have any goodies on your Wish List from the 2021-2022 annual catalog, be sure to get them ordered before they retire on May 2nd. Being a transition month, this month’s blog theme is Mix & Match. I decided to Mix & Match some techniques for you today featuring the Forever Fern Stamp Set. I hope you enjoy them.
So I have a set of projects for you today. Three similar but different cards all featuring the Forever Fern stamp set, which is one of my favorites, and I am really glad it is sticking around for another year in our stamp collection. I am mixing and matching techniques for you, all with the idea of building different background images while keeping the focal images almost the same.
Watch the Show & Tell video to see me take you through all three projects. And then leave me a comment on if these are new to you, and if you might give any of them a try! Then hop on along to the next blog for today’s hop and enjoy another fun project inspiration.

YOUTUBE LINK
Happy Stampin,
Susan
Pumpkin Hill Stampers


Supplies List - Shop Online 24/7
Stamp Sets:
- Forever Fern 152559
- Sunny Sentiments 155034
Ink:
Cajun Craze, Crushed Curry, Shaded Spruce, Old Olive
Paper:
Cajun Craze, Shaded Spruce, Crushed Curry, Shimmery White
Accessories:
- Forever Flourishes Dies 152714
- Sponge Daubers 133773
- Simply Scored Tool 122334
- Paper Snips 103579
- Stampin’ Trimmer 152392
- Stampin’ Cut & Emboss 149653
- Bone Folder 102300
- Dimensional 104430
- Multi Purpose Adhesive 110755
Project Instructions:
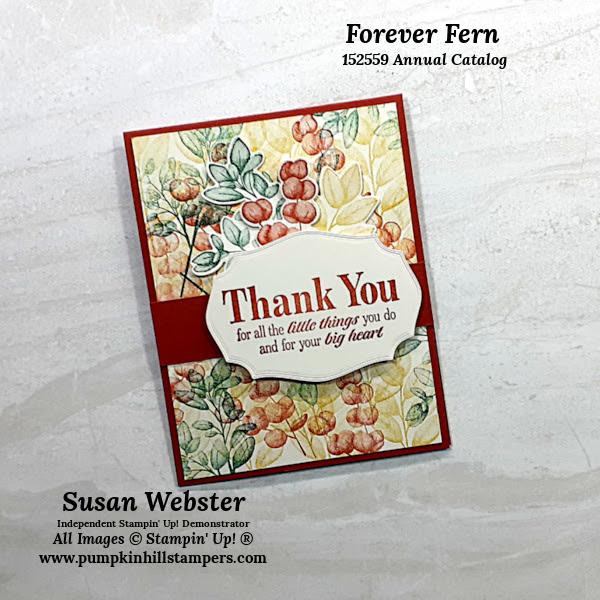
Triple Stamping Technique
-
Cut a 11” x 8 ½” piece of Cajun Craze cardstock. Score at 5 ½”. Fold in half to form a card base. Burnish crease using a Bone Folder.
-
On a piece of Shimmery White cardstock, 4” x 5 ¼”, stamp the images onto the panel. Start with the Crushed Curry Ink and one of the image stamps, fill the area. Repeat the process with a second image and the Cajun Craze ink, then again with a third image and the Shaded Spruce ink.

-
Repeat the stamping of the images with colors you already used onto another piece of 4” x 5 ¼” Shimmery White cardstock. Then die-cut with the coordinating dies.
-
Adhere the stamped panel to the front of the card.
-
Add a Cajun Craze 4 ¼” x 1” paper ribbon across the section.
-
Now stamp with Cajun Craze ink the sentiment of your choice, and die cut with the Tasteful Labels Dies. Mount to the card and then add your stamped and die-cut embellishments to the label.
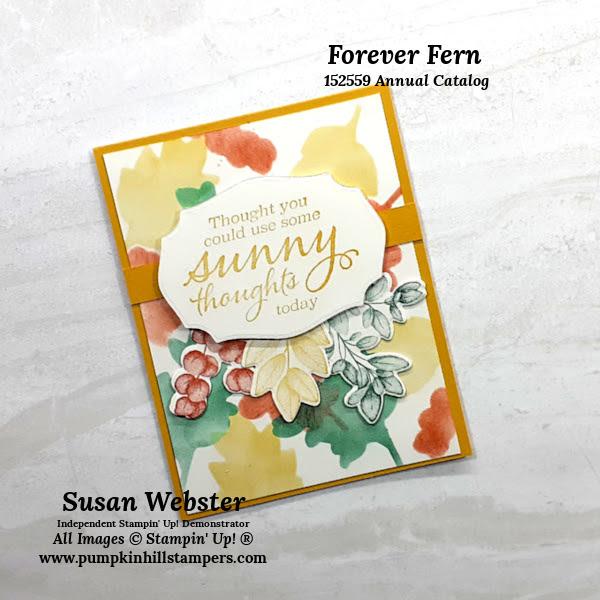
Sponged Masking Background Technique
-
Cut a 11” x 8 ½” piece of Crushed Curry cardstock. Score at 5 ½”. Fold in half to form a card base. Burnish crease using a Bone Folder.
-
From a piece of Vellum cardstock, make a mask for the die-cut images of your choosing.

-
Now use those masks and your ink colors to create your sponges, masked background panel. On a piece of Shimmery White cardstock, 4” x 5 ¼”.
-
Repeat the stamping of the images with colors you already used onto another piece of 4” x 5 ¼” Shimmery White cardstock. Then die-cut with the coordinating dies.
-
Adhere the stamped panel to the front of the card.
-
Add a Crushed Curry 4 ¼” x 1/2” paper ribbon across the section.
-
Now stamp with Crushed Curry ink the sentiment of your choice, and die cut with the Tasteful Labels Dies. Mount to the card and then add your stamped and die-cut embellishments to the label.

Sponged | Masked | Stamped Technique
-
Cut a 11” x 8 ½” piece of Shaded Spruce cardstock. Score at 5 ½”. Fold in half to form a card base. Burnish crease using a Bone Folder.
-
On a piece of Shimmery White cardstock, 4” x 5 ¼”,
-
First use your masks to sponge the shapes onto the cardstock.
-
Now use the coordinating stamp image to stamp with the same color on top of the sponged areas.
-

-
Repeat the stamping of the images with colors you already used onto another piece of 4” x 5 ¼” Shimmery White cardstock. Then die-cut with the coordinating dies.
-
Adhere the stamped panel to the front of the card.
-
Add a Shaded Spruce 4 ¼” x ½ ” paper ribbon across the section.
-
Now stamp with Shaded Spruce ink the sentiment of your choice, and die cut with the Tasteful Labels Dies. Mount to the card and then add your stamped and die-cut embellishments to the label.
Contact/Follow:
Shop my online store: http://bit.ly/SusanWebsterShop
Send me an email: susan@pumpkinhillstampers.com
Follow me on FaceBook: https://www.facebook.com/pumpkinhillstampers/
Follow me on Instagram: https://www.instagram.com/pumpkinhillstampers/
Customer FaceBook Group: https://www.facebook.com/groups/stampandchatwithsusan
Read my blog: http://pumpkinhillstampers.thesearemystamps.com/
Follow me on Pinterest: https://www.pinterest.com/phstampers/
Follow me on Youtube: https://tinyurl.com/youtube-pumpkinhillstampers