
Love Is In The Air - Inspirations Blog Hop Feb 2021


LOVE IS IN THE AIR! Well at least I hope it is for all of you. Tomorrow is Valentine’s Day, so be sure to give your sweetie a smooch. And I recently learned today is “G”alentine’s Day, so you can always send your bestie some love too.
For today’s STAMPING INKspirations BLOG HOP February 2021 Edition, I have a fun watercolor project for you. Well it started out as a watercolor project. Then I seem to have used almost all my favorite techniques. So I guess you could say I used my joy and love of stamping & creating cards to craft for you today.
The full tutorial is posted below after the photo. It includes my step-by-step instructions. If you have questions, leave me a comment.
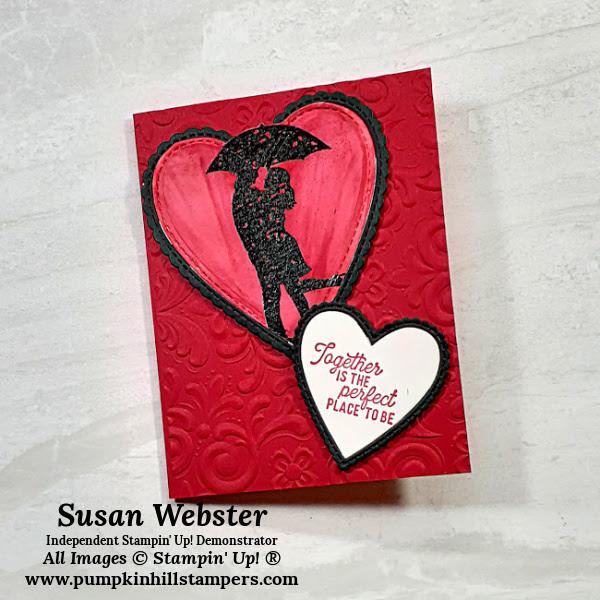
I featured the image from the Silhouette Scenes stamp set of the guy and gal under the umbrella, I just love this image. Then I created a fun die-cut heart frame, but be sure to see my instructions on cutting it out. I also used one of my favorite things to do with ink, stamps and paper, HEAT EMBOSS. So lots of little techniques and touches.
Here's my project, hope you love it! Then remember to continue hopping with us today. The NEXT LINK will take you to Susan Simpson's project post. Then just keep hopping, we have 37 projects to share today. If you loose a link, they are all posted below as well. And please, leave us comments. We LOVE to hear from you.
Happy Heart Day!
Be Mine with Silhouette Scenes
... for Love is in the Air Inkspirations Blog Hop
Supplies:
Stamp Sets – Silhouette Scenes [149223]
Card Stock – Real Red [102482], Fluid 100 Watercolor Paper [149612], Basic Black [121045], Basic White [159276]
Stamp Pads – Versamark [102283], Real Red [147084]
Misc - Black Emboss Powder, Heat Tool [129053], Stampin’ Cut & Emboss Machine [149653], Be Mine Stitched Framelits [148527], Parisian Flourish 3D Embossing Folder [151474], Water Painters [151298], Stamparatus [146276], Paper Snips [103579], Dimensionals [104430]
Measurements:
- Card Base 8 ½ x 5 ½ [scored at 4 ¼]
- Watercolor Paper 4 x 5 ¼
- Basic Black 4 x 5 ¼ [die cut both hearts from this piece]
- Whisper White 3 x 3
- Card Liner 4 x 5 ¼
Instructions:
Heat Emboss
-
I used my Stamparatus to stamp this image onto the watercolor paper. For two reasons:
-
Watercolor paper has a texture, and sometimes it’s difficult to get a good solid image.
-
It allowed me to ink up and stamp the image a couple of times with the Versamark Ink. And the image didn’t move.
-
So ink your stamp with Versamark Ink and stamp in the center of your watercolor paper. [repeat 2 or 3 times]
-
Dust with Emboss Powder, tap off excess.
-
Heat emboss with Heat Tool.
Dry Embossing
-
I ran my card through the Cut & Emboss machine with the Parisian Flourish embossing folder.
Die Cut Layers
-
First die-cut the large Heart with the center heart die from the Basic Black cardstock. This will leave you with the scalloped edge heart to frame the image.
-
Then from the center heart scrap, die-cut the smaller scalloped edge heart as well.
-
Die-cut from Basic White the smaller center heart for your sentiment.
-
Now the tricky part! Die-cut the heat-embossed image…
-
If you look closely, you will notice that the umbrella is sticking outside the heart shape.
-
So to die cut this, first use the center full heart that will leave the stitched edge on the cardstock, but not cut the heart free.
-
Then with the large scalloped heart die, cut it again… BUT - only put the clear cutting plate on the image up to the bottom edge of the UMBRELLA image.
-
This will leave it partially attached to the watercolor paper.
-
Now use our paper snips to fuzzy cut the top of the heart and leave the umbrella full.
Watercolor
-
Use your watercolor brushes and wet the watercolor die-cut heart with your embossed image.
-
Now add Real Red Ink to the lid of your ink pad. Either squeeze it while it is closed to transfer ink to the lid. Or use your re-inker and add a drop or two of ink to the inside of the lid.
-
Use your watercolor brush to pick up some ink and start painting your die-cut heart.
-
You can as much, or as little as you wish.
Stamp your Greeting
-
Stamp your greeting with Real Red ink onto the Basic White die-cut heart.
Assemble the Image & Sentiment Hearts
-
I placed mine face down on my table.
-
Then line up the Basic Black scalloped heart around the center hearts.
-
I used dimensionals and pieced them back together around the stitched seam.
-
Then peel the backers off and align on the face of your card.
FEBRUARY 2021
Angie McKenzie ● Alejandra Gomez ● Vicki Milyard
Tricia Butts ● Rochelle Laird-Smith ● Annette Ball
Jo Blackman ● Leonie Stuart ● Jan Musselman
Terry Hamilton ● Lisa Mackey ● Deb Macdowell
Sue Allen ● Gez Carpenter ● Rebecca-Jo Unwin
Linda Moore ● Satomi Wellard ● Aurélie Fabre
Melissa Faust ● JoAnn Pollock ● Narelle Fasulo
Mo Rootes ● Karen Henderson ● Susan Webster
Susan Simpson ● Anne Marie Hile ● Ann Krucek
Shel Anderson ● Kimberley Morris ● Sharon Hashimoto Burkert
Danielle Kassing ● Chris Smith ● Mikaela Titheridge
Elaine de Montmorency ● Jill Chapman ● Teri West ● Libby Fens