
Beauty Abounds Tag & Card Projects

Beauty Abounds Tag & Card Project
Hello my stamping friends.
So today I am sharing a two part project. Part 1 is a 3 x 5 tag or bookmark that I crafted for a swap with the Joy of Sets FB group. But then, for Part 2, I show you how easy it is to create a card just by adding it to the face of a cardbase.
Almost two easy right?
Well, it can be that easy… put some time into crafting smaller images like tags, bookmarks, or ATC (artist trading cards), then just add them to coordinating cardbases.
Okay, so I do have a short Stampin' Show & Tell video demonstration for you as well, so open the link to watch me pull this quick and easy project together for you from start to finish. Then drop me a comment and let me know if this is something you would try yourself.

YouTube Link
Happy Stampin,
Susan
Pumpkin Hill Stampers
Supplies List - Shop Online 24/7
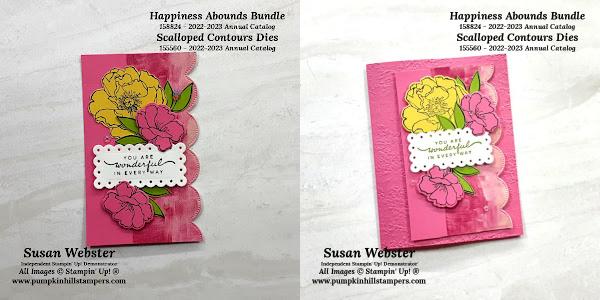
Stamp Sets & Dies: Happiness Abounds 158824 *Bundle, Scalloped Contours Dies 155560
Ink: Memento, Granny Apple Green
Paper: Polished Pink, Daffodil Delight, Granny Apple Green, Hues of Happiness DSP 158822
Accessories: Iridescent Rhinestones 158130, Timeworn Type 3D EF 156505
Tools: Simply Scored Tool 122334, Stampin’ Trimmer 152392, Bone Folder 102300, Cut & Emboss Machine 149653
Adhesives: Multipurpose Adhesive 110775, Dimensionals 104430
Project Instructions:

Part 1: 3 x 5 Tag
-
Prepare the two base pieces and collect cardstock (Scrap) for the flowers and tag
-
Die cut the DSP with the scalloped edge from the Scalloped Contours Dies
-
Die cut the label on the Basic White cardstock from the Scalloped Contours Dies
-
Stamp the flowers and leaves with Memento ink
-
Die-cut the flower and leaves with the coordinating dies from the Hues of Happiness bundle
-
Assemble the two base pieces side by side so that the finished size is 3 x 5
-
Add the tag with dimensionals
-
Add the flowers and leaves to decorate the around the tag
-
Add the Iridescent Rhinestones for a little sparkle

Part 2: Make a Card
-
Now emboss a Polished Pink card base (5 ½ x 8 ½) with the Timeworn Type 3D Embossing Folder
-
Add the tag to the card front

Contact/Follow:
Shop my online store: http://bit.ly/SusanWebsterShop
Send me an email: susan@pumpkinhillstampers.com
Follow me on FaceBook: https://www.facebook.com/pumpkinhillstampers/
Follow me on Instagram: https://www.instagram.com/pumpkinhillstampers/
Customer FaceBook Group: https://www.facebook.com/groups/stampandchatwithsusan
Read my blog: http://pumpkinhillstampers.thesearemystamps.com/
Follow me on Pinterest: https://www.pinterest.com/phstampers/
Follow me on Youtube: https://tinyurl.com/youtube-pumpkinhillstampers