
Hues of Happiness - Cut It Out

Hues of Happiness DSP
Cut It Out - 3rd Thurs Blog Hop


Hello my stamping friends.
Today I have a project that features cutting out flowers from the Hues of Happiness DSP. That’s right, this month’s theme for the 3rd Thurs Blog Hop is “CUT IT OUT”! So I took it literally and am sharing a project where we cut out our embellishments from the spectacular DSP patterned paper.
Take a quick look at this. You can use the coordinating dies from the Happiness Abounds stamp set/die Bundle, or use your paper snips. Both methods allow you to create your own beautiful embellishments to add to your project.

I used a fun fold base card for this project, and have shared the details in my photo tutorial below. But I also have a Stampin’ Show & Tell demonstration for you to watch as I put this whole project together for you from start to finish. Watch how easy this fun fold is and how quickly you can decorate a card with these cut out embellishments.

YOUTUBE LINK
Okay, now it’s time to leave me a comment, and then hop along to the next crafter for today’s blog hop! Hope you enjoyed my card project today and that you are inspired to create one of your own soon. Enjoy Jan Musselman's project next.
Happy Stampin,
Susan
Pumpkin Hill Stampers

Susan Webster - YOU ARE HERE!
Supplies List - Shop Online 24/7
Project Shopping Link
Stamp Sets, Folders & Dies: A Grand Kid 152500, Fern 3D Embossing Folder 158804, Layering Circle Dies 151770, Blossoming Happiness Dies 158823
Ink: Granny Apple Green
Paper: Basic White, Daffodil Delight, <Flirty Flamingo> in the video,

Tools: Simply Scored Tool, Stampin’ Trimmer, Bone Folder, Cut & Emboss Machine, Paper Snips
Adhesive: Dimensionals, Multipurpose Glue
Project Instructions:
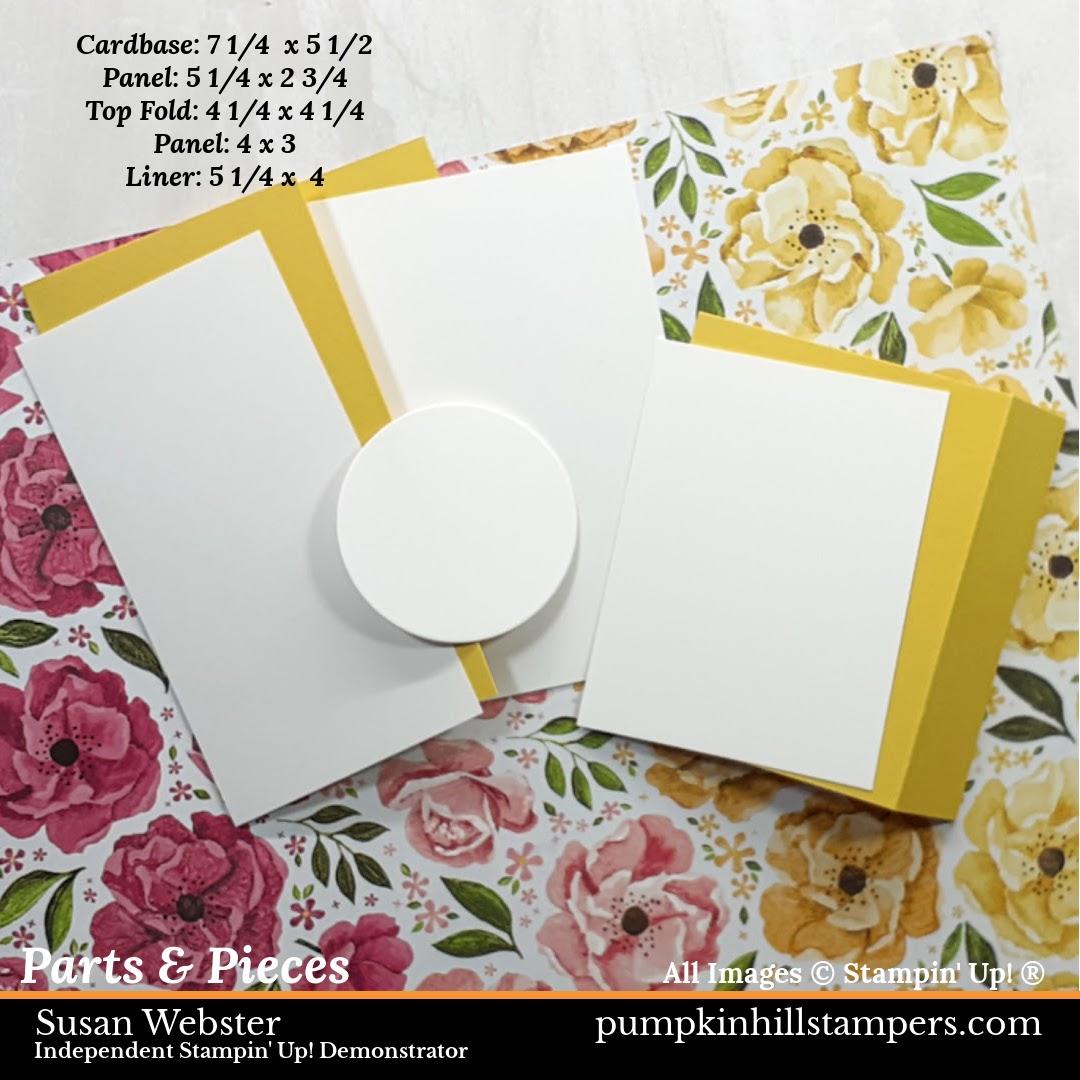
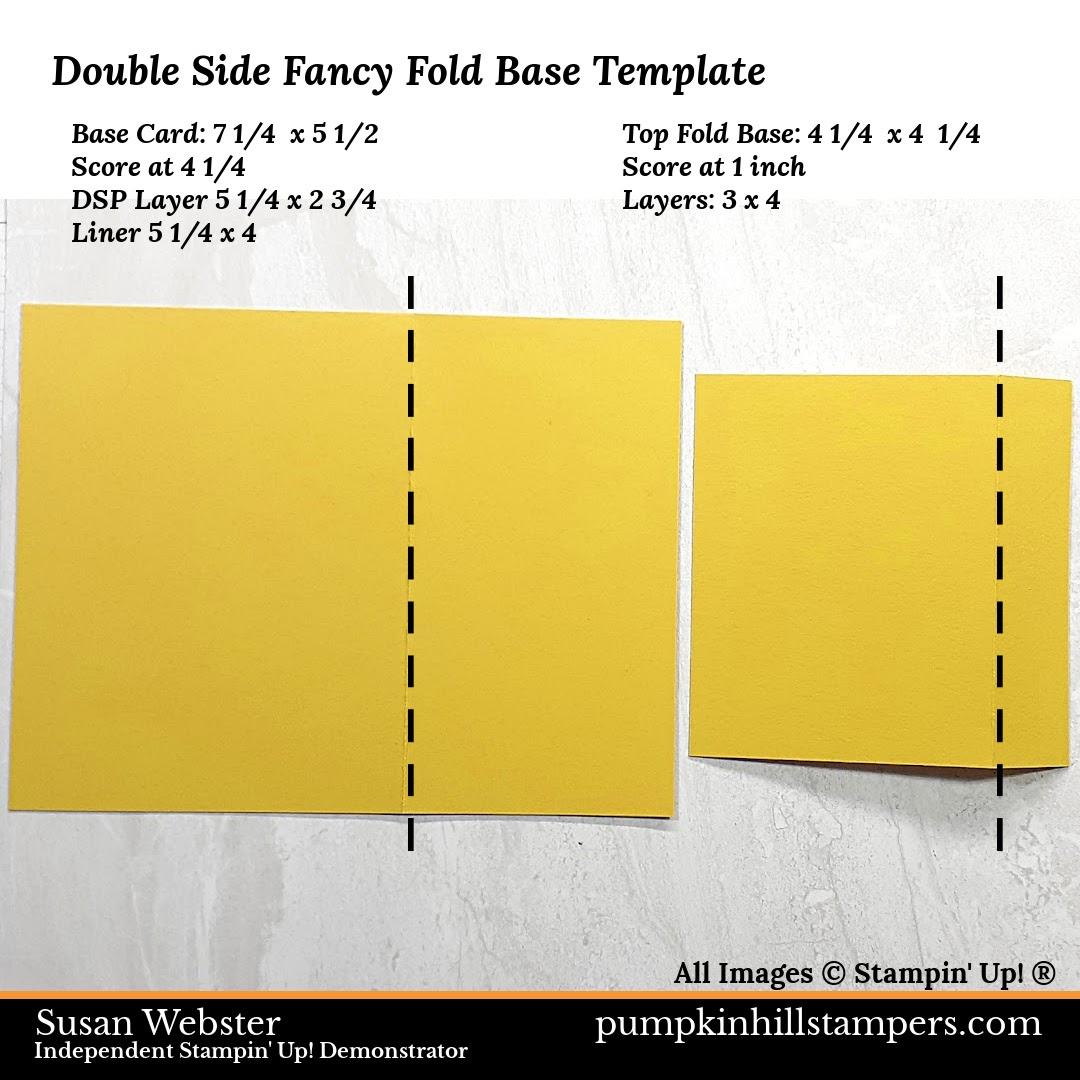
I always start by making all my pieces for the project. I followed the fancy fold template.

These are quick and easy steps to create a little texture and color to the background panels for the card. I used the Fern Embossing Folder to add texture to my Basic White panels. Then I used my Granny Apple Green ink and a sponge dauber to apply a light ink application for a colored background. I like how it can be colored but still have some white areas on the piece. Then I used the Multi-purpose glue to add the two panels.

Apply each layer and the fold over flap with Multi-Purpose Adhesive as well. Line up the 1 inch scored section of the smaller flap with the right hand edge of your card base. Then add the liner to cover up the addition.

Next die-cut or fuzzy cut your flower embellishments. Next add the sentiment with dimensionals. This allows us to tuck the flowers behind the sentiment for easy layers. Add the flowers where you like to fill in both background panels.
Leave Me A Comment!
I would love to hear what you thought of this project. Is it a pattern you will use in your own projects? Thanks for visiting today.
Contact/Follow:
Shop my online store: http://bit.ly/SusanWebsterShop
Send me an email: susan@pumpkinhillstampers.com
Follow me on FaceBook: https://www.facebook.com/pumpkinhillstampers/
Follow me on Instagram: https://www.instagram.com/pumpkinhillstampers/
Customer FaceBook Group: https://www.facebook.com/groups/stampandchatwithsusan
Read my blog: http://pumpkinhillstampers.thesearemystamps.com/
Follow me on Pinterest: https://www.pinterest.com/phstampers/
Follow me on Youtube: https://tinyurl.com/youtube-pumpkinhillstampers