
Pretty Flowers Embossing Folder with Ink Techniques

Pretty Flowers with Iconic Dies
Embossing Folder & Ink Techniques

Hello my stamping friends.
So today I have a fun tutorial for you all about embossing folders and applying ink to embossed images. We have 4 fun projects to share, so be sure to watch the Stampin’ Show & Tell video demonstration and watch as each one is put together for you.

YOUTUBE LINK
Now that you have watched, leave me a comment to which one you enjoyed the most, or which technique you might try!
If you need a list of supplies or the written instructions, they are here as well. Just keep scrolling to find all the details.
Happy Stampin,
Susan
Pumpkin Hill Stampers
Supplies List - Shop Online 24/7
Stamp Sets: Peaceful Moments 151595
Ink: Crushed Curry, Shaded Spruce, Memento
Paper: Crushed Curry, Basic White, Shaded Spruce, Basic Black
Accessories:
- Pretty Flowers EF 155428
- Iconic Dies 155965
- Tasteful Labels Dies
- Stitched So Sweetly Dies
- Sponge Daubers 133773
- Simply Scored Tool 122334
- Paper Snips 103579
- Stampin’ Trimmer 152392
- Stampin’ Cut & Emboss 149653
- Bone Folder 102300
- Dimensional 104430
- Mini Glue Dots 103683
- Multi Purpose Adhesive 110755
Project Instructions:

-
Cut a 11” x 8 ½” piece of Basic White cardstock. Score at 5 ½”. Fold in half to form a card base. Burnish crease using a Bone Folder.
-
Position the front of the card in the embossing folder to leave about 1 ½” of blank space near the fold. Stamp your sentiment here after you emboss the card.
-
Die-cut your embellishments from Basic White cardstock and the embellishment.

-
Cut a 11” x 8 ½” piece of Shaded Spruce cardstock. Score at 5 ½”. Fold in half to form a card base. Burnish crease using a Bone Folder.
-
Emboss a piece of Basic White cardstock 5 ¼” x 4” with the Pretty Flowers Embossing Folder.
-
Die-cut the ferns from Shaded Spruce cardstock and flower from the Crushed Curry cardstock. Also from Basic White the sentiment label from Stitched So Sweetly Dies.
-
Now with a sponge dauber, add ink to the embossed panel as you wish.
-
Adhere all your elements to the card.
-
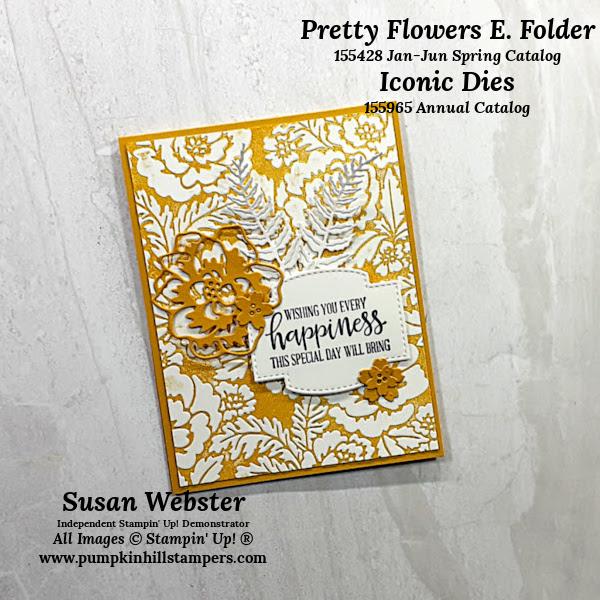
Cut a 11” x 8 ½” piece of Crushed Curry cardstock. Score at 5 ½”. Fold in half to form a card base. Burnish crease using a Bone Folder.
-
Ink up the inside panel of the embossing folder with Crushed Curry ink.
-
Emboss a piece of Basic White cardstock 5 ¼” x 4” with the Pretty Flowers Embossing Folder. The ink will transfer to your cardstock.
-
Die-cut the flowers from the Crushed Curry cardstock, ferns from Basic White cardstock. Also from Basic White the sentiment label from Stitched So Sweetly Dies.
-
Adhere all your elements to the card.

-
Cut a 11” x 8 ½” piece of Crushed Curry cardstock. Score at 5 ½”. Fold in half to form a card base. Burnish crease using a Bone Folder.
-
Ink up the inside panel of the embossing folder with Crushed Curry ink.
-
Press a piece of Basic White cardstock 5 ¼” x 4” into the Pretty Flowers Embossing Folder. The ink will transfer to your cardstock.
-
Die-cut the flowers and the bee from the Crushed Curry cardstock.
-
Add a piece of Basic Black cardstock at 4” x ¾” as a paper ribbon.
-
Stamp your sentiment directly to the printed panel.
-
Adhere all your elements to the card.
Contact/Follow:
Shop my online store: http://bit.ly/SusanWebsterShop
Send me an email: susan@pumpkinhillstampers.com
Follow me on FaceBook: https://www.facebook.com/pumpkinhillstampers/
Follow me on Instagram: https://www.instagram.com/pumpkinhillstampers/
Customer FaceBook Group: https://www.facebook.com/groups/stampandchatwithsusan
Read my blog: http://pumpkinhillstampers.thesearemystamps.com/
Follow me on Pinterest: https://www.pinterest.com/phstampers/
Follow me on Youtube: https://tinyurl.com/youtube-pumpkinhillstampers