
Quite Curvy Dies Trio | Galentine's Day Projects
QUITE CURVY TRIO | GALENTINE'S DAY PROJECT

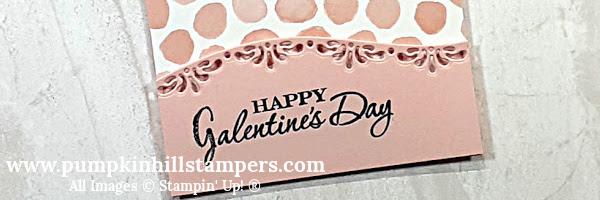
QUITE CURVY | GALENTINE'S DAY PROJECT - CARD 1

Supplies:
Stamp Sets – Make A Difference [146676], Heart to Heart [151427]
Card Stock – Powder Pink [RETIRED], Patterned Paper [RETIRED]
Stamp Pads – Basic Black Marker [100082]
Misc - Powder Pink Ribbon [RETIRED], Curvy Dies [154319], Stampin’ Cut & Emboss Machine [149653],
Stampin’ Seal, Dimensionals, Paper Snips
Measurements:
Card Base 11 x 4 [scored at 5 ½]
Patterned Paper 4 x 4
Die Cut Cardstock 3 x 4
Instructions:
Die Cut Layer
-
Using the Curvy Dies cut the 3 x 4 cardstock piece in half. Creating two sections to use on your card.
Stamping
-
Ink your Sentiment stamp with your Stampin’ Write Marker so that you can OMIT the “V” from Valentine’s Day.
-
Now ink your “G” from the alphabet set and stamp in place of the “V”.
Build Your Card
-
Adhere the patterned paper to the center of the front of your card base.
-
Now position dimensionals on the back of both of your die-cut sections of cardstock.
-
One will be positioned at the fold of the card.
-
The second will be positioned at the opposite end of the card.
-
By putting both sections on dimensionals, you are created a recessed section of the card.
-
Now wrap the ribbon around the card and tie a bow knot. Trim the ends with your paper snips.
QUITE CURVY | GALENTINE'S DAY PROJECT - CARD 2

Supplies:
Stamp Sets – Berry Blessings [155276] - Sale-a-bration Set 2021
Card Stock – Powder Pink [RETIRED], Patterned Paper [RETIRED]
Stamp Pads – Memento Black Ink [132708]
Misc - Powder Pink Ribbon [RETIRED], Curvy Dies [154319], Stampin’ Cut & Emboss Machine [149653]
Tombow Adhesive, Paper Snips, Paper Trimmer
Measurements:
Card Base 8 x 4 [scored at 4]
Patterned Paper 4 x 4
Die Cut Cardstock 3 x 4
Instructions:
Die Cut Layer
-
Using the Curvy Dies cut the 3 x 4 cardstock piece in half. Creating two sections to use on your card.
Stamping
-
Ink your sentiment stamp and position on the die-cut cardstock.
Build Your Card
-
Adhere the patterned paper to the front of your card base.
-
Adhere the die-cut section of cardstock with your sentiment on it. I positioned mine an inch above the edge of the card.
-
Now add a little adhesive along the bottom edge of your sentiment layer, and adhere the ribbon.
-
Let dry, then trim ends of ribbon with your paper snips.
QUITE CURVY | GALENTINE'S DAY PROJECT - CARD 3

Supplies:
Stamp Sets – Happy Thoughts [154507]
Card Stock – Powder Pink [RETIRED], Patterned Paper [RETIRED]
Stamp Pads – Memento Black Ink [132708]
Misc - Powder Pink Ribbon [RETIRED], Curvy Dies [154319], Stampin’ Cut & Emboss Machine [149653]
Tombow Adhesive, Dimensionals, Paper Snips, Paper Trimmer
Measurements:
Card Base 11 x 4 [scored at 5 ½]
Patterned Paper 4 x 4
Die Cut Cardstock 3 x 4
Instructions:
Die Cut Layer
-
Using the Curvy Dies cut the 3 x 4 cardstock piece in half. Creating two sections to use on your card.
Stamping
-
Ink your sentiment stamp and position on the die-cut cardstock.
Build Your Card
-
Adhere the patterned paper to the top of the front of your card base.
-
Now use your paper trimmer and trim off 1 ¼ inches of the front end of the card.
-
This is to reveal the inside layer.
-
Now with dimensionals, add the die-cut section of the card to the front of the card.
-
Line up the dimensionals along the cut line, then position the die-cut piece to the adhesive.
-
Wrap the ribbon around the card, and tie a bow knot. Trim the ends with your dimensionals.